When creating a machine learning model, a data scientist needs to divide their dataset into subsets that are used at various points in the process. This division of data is referred to as data sampling. Its objective is to ensure that the performance metrics of the model (e.g. predictive power) are as accurate as possible. Here we explore basic sampling methods and demonstrate how to accomplish data sampling in Dataiku.
Choosing Your Data Sampling Method
There are multiple methods for splitting datasets, but we will focus on the most common ones that are also available in Dataiku. These include splitting based on a percentage of your data and the k-fold cross-validation method.
There are two cases to consider when you approach data sampling and they are based on the number of models being trained. In one case, you only need to split your data into two parts. In the other, you need to split it into three.
Case 1: You are training only one model.
If you are planning to train one model, your process will look like the diagram below.
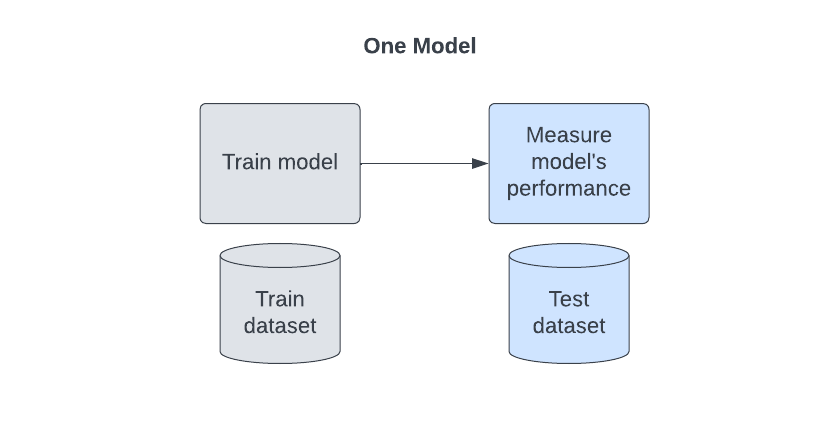 In this case, you simply need to split your data into two samples:
- Train. Data used to train the model (e.g. 80% of the rows). This dataset is the data upon which the model is trained. It will learn only from this data.
- Test. This can also be called the “hold-back set”. In this case, data is used to measure the model’s performance ( e.g. 20% of the rows). Test data is never seen by the model so its measure of the model’s performance is unbiased. This is the key to ensuring accurate performance measurements.
.png?width=684&height=359&name=One%20Model%20(2).png) The Train dataset is usually between 70-80%. This may vary depending on how many total rows are in your dataset. With one model, data sampling can be very simple. There are different approaches for how you choose the specific rows which we will get into in a later section.
The Train dataset is usually between 70-80%. This may vary depending on how many total rows are in your dataset. With one model, data sampling can be very simple. There are different approaches for how you choose the specific rows which we will get into in a later section.
Case 2: You are training more than one model.
With the advancement of ML toolsets, the ability to train many models for any given problem is much more achievable than with hand-coded approaches. Dataiku is one great example of a tool providing this capability, and it assumes you will train more than one model so for this example we will assume you will have multiple models.
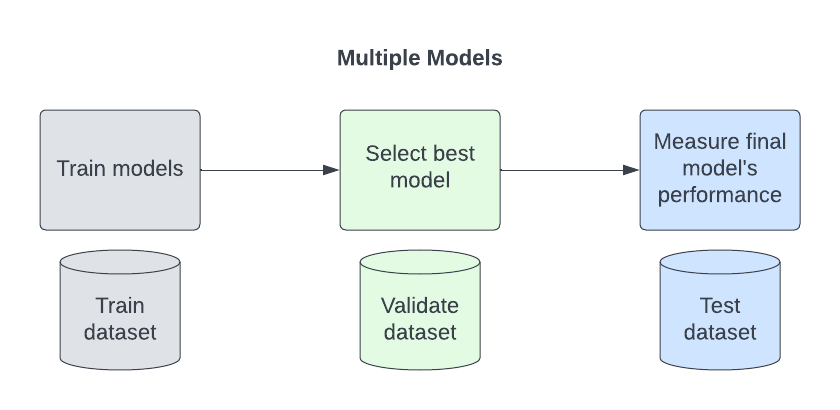
Using multiple models impacts data sampling. You will need one more division of data–the Validate set. The Validate set is used to decide between models. Your process will look like this:
 Let’s look at two methods for data sampling: splitting data by percentage and using k-fold cross-validation.
Split your data into three samples by percentage.
This is the same method we used above applied to one model. The difference here is that you now have three divisions so your percentages will change. You will give up some of your Train dataset to populate the Validate dataset.
- Train. Data is used to train the model. (e.g. 60%)
- Validate. Data is used to select between multiple models. (e.g. 20%)
- Test. The hold-back set. Data is used to measure the final model’s performance. (e.g. 20%)
Train is used to train multiple models. Then Validate is used on all the models to see which one performs the best. Test is used with the chosen model to compute performance metrics.
Use K-Fold Cross Validation.
K-fold is recommended because it utilizes every data point in both the training and validation. This can be important if you have valid outliers or small subsets of points that are unlike the bulk of your data. This method does take a little more time and compute power vs. a simple percentage split but it is often worth it. Let’s look at it step by step, keeping in mind that this process is performed for you by Dataiku (or R or Python).
- First, your data is split into two sets. One set will contain both Train and Validate datasets and will represent about 80% of your data. The other set will contain the Test dataset, about 20% of your data.
- Next, the Train + Validate data will be split randomly into k equal groups or folds. Common values of k are 5 or 10 but to illustrate, we’ll use k = 4.
- Each model will be trained iteratively on k-1 folds while being validated on the left-out fold. For example, if k = 4, one training will be on folds 1, 2, and 3 and validation will be on fold 4. Then another training will be on 1, 2, and 4 and validation will be on fold 3. All the k validations are then averaged to gauge model quality.
- The model with the best average validation metrics is chosen.
- Once a model is selected, the final model is trained on all k folds.
- Finally, the Test set is used to measure the quality of the final model.
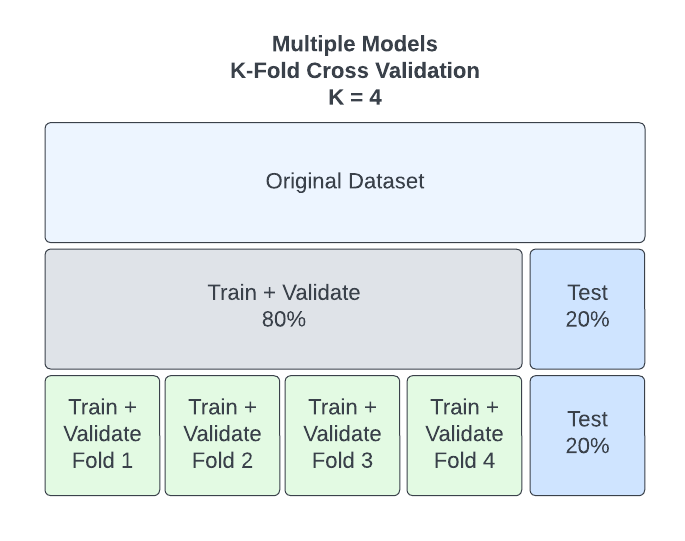 Iteration 1: Train set = Fold 1, 2, 3; Validation = Fold 4
Iteration 2: Train set = Fold 1, 2, 4; Validation = Fold 3
Iteration 3: Train set = Fold 2, 3, 4; Validation = Fold 1
Iteration 4: Train set = Fold 1, 3, 4; Validation = Fold 2
Sample Creation in Dataiku
Now that we understand how data sampling works in theory, let’s look at how to implement it inside Dataiku. Remember that we are working under the assumption that we are evaluating more than one model, therefore we will always require a validation sample.
When performing Machine Learning (ML) processes in Dataiku, data prep often happens outside of the Lab while model generation occurs inside the Lab. In the case of data sampling, the first step is performed outside the Lab and the second step is done inside the Lab.
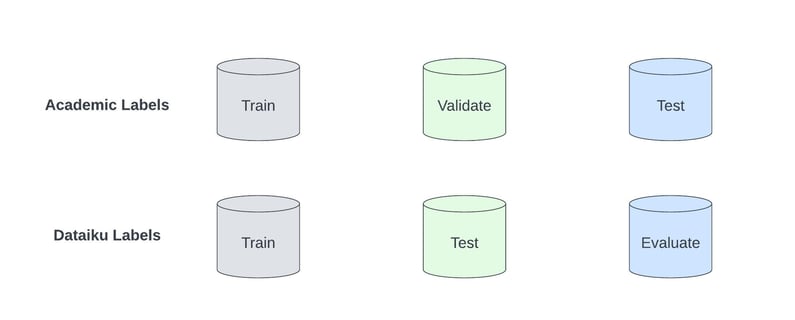
You will find a difference between the academic/industry naming of these split datasets and how they are referenced in Dataiku. Keep this in mind as you complete this step.
Step 1: Split data between Train + Validate and Test
To begin, we will perform the first split by using a Split recipe. There are multiple ways to split a dataset but this is the most efficient and effective way.
- Select your dataset then choose the Split visual recipe.

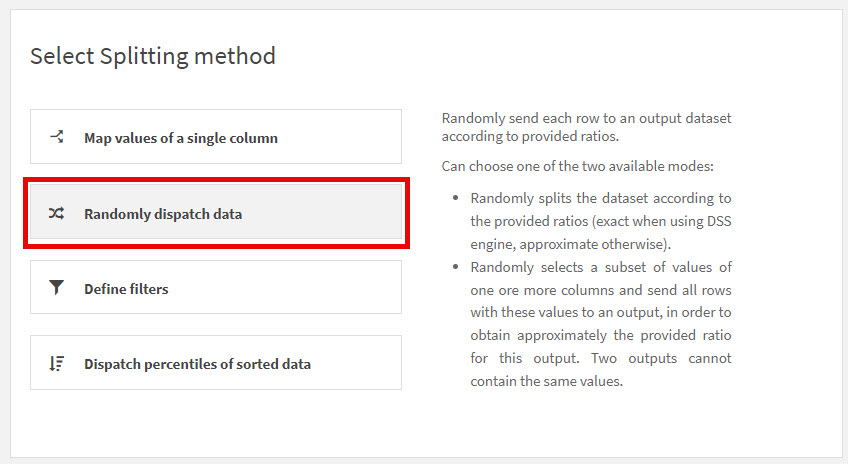
- You will see these choices. The Split recipe is very handy for many different scenarios but in this case, we simply want to split the data randomly so select Randomly dispatch data.
- For “Dispatch mode” choose Full random. Set the ratio for your Train dataset to the desired percentage–here we chose 80%. Make sure to select the Test dataset for the output of the remaining percentage.
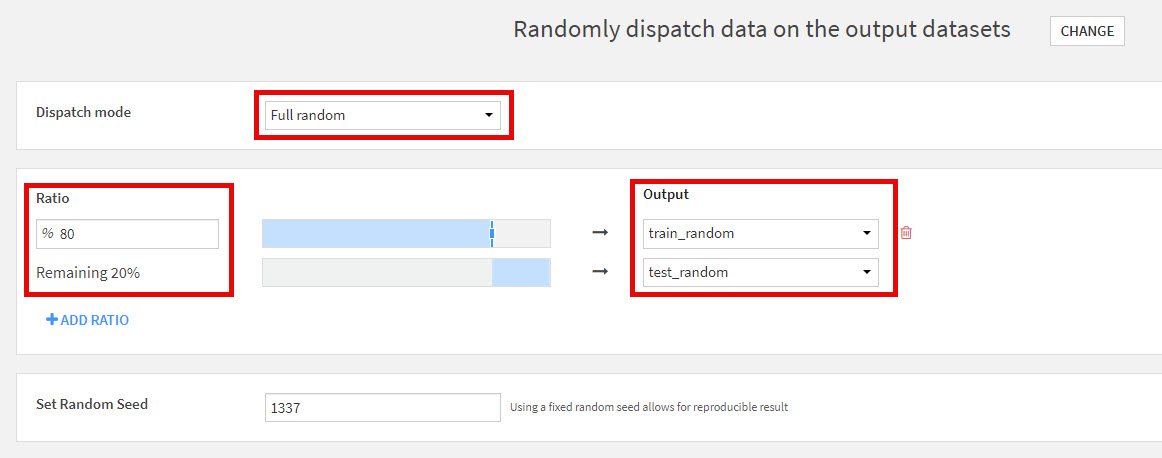
- Run the recipe and take a look at the outputs. Train should have exactly 80% of the original dataset’s rows and Test exactly 20%. Note that if you need to ensure a balanced distribution of a particular column, such as the case in stratification, currently Dataiku does not offer a stratified method for splitting data. To truly stratify a dataset, you can use the ‘train_test_split’ function from the "sklearn.model_selection library" in a Python recipe.
Step 2: Split Train + Validate Dataset Into Two Datasets
In step one, we created two datasets–one that will go into the Lab and provide Train + Validate data and another hold-out dataset that will be used for testing our final chosen model once the model is deployed. In Dataiku, unless using a code recipe, the split of Train + Validate into two datasets occurs in the Lab.
Splitting Selections
Let’s illustrate using the train_random dataset created previously. We select the dataset, go to Lab > Visual ML > AutoML prediction. Here we select the feature (column) that we wish to predict. For this example, let’s choose a continuous variable, grade.
Now that we are in the Lab, we’ll go to the Design tab and explore the settings found under Basic > Train/Test Set.
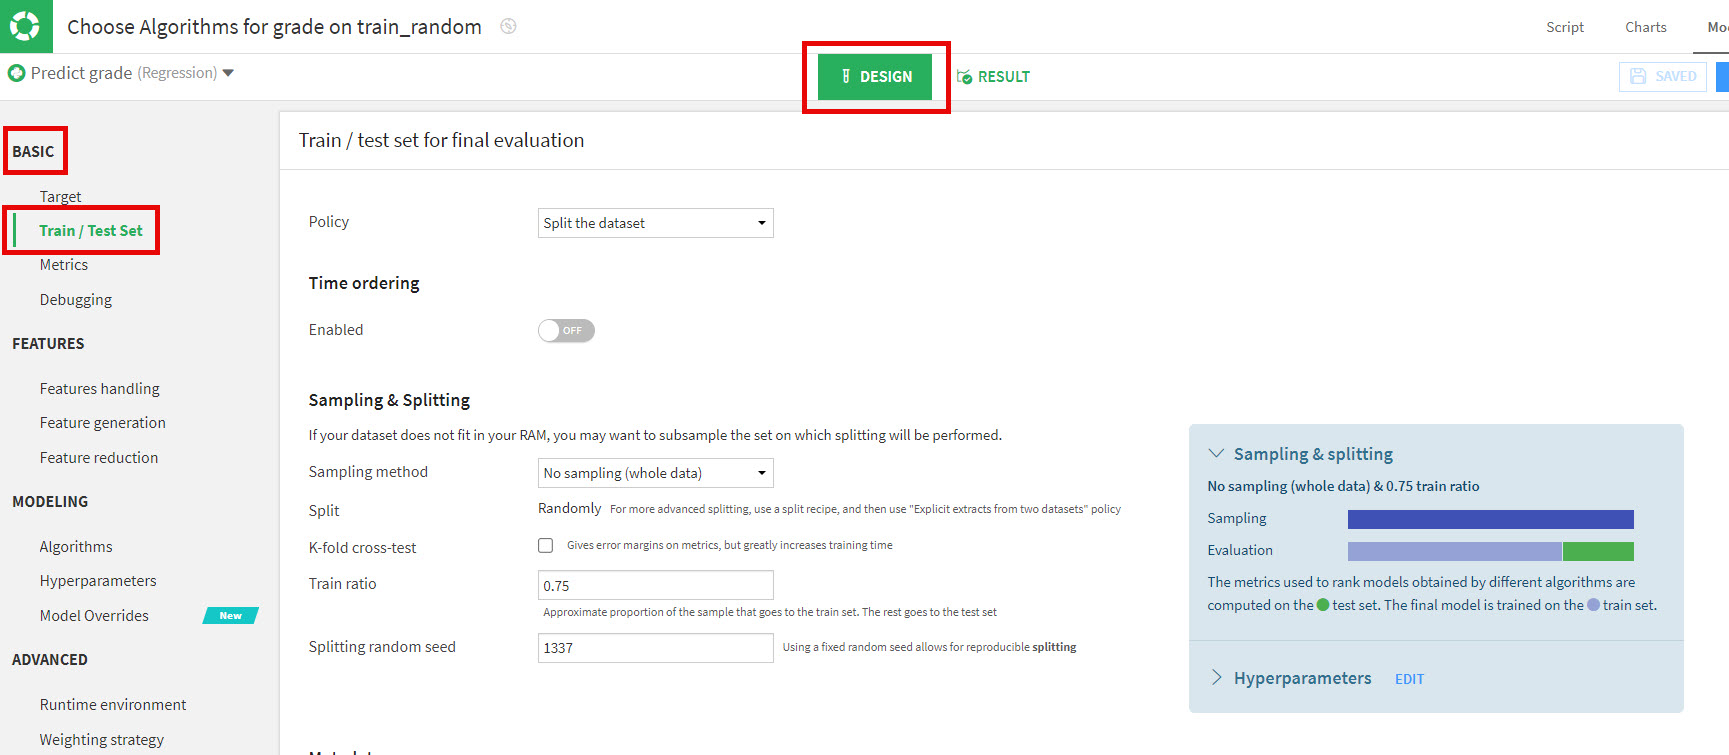
Policy
In most cases, it is advisable to simply use Split the dataset, which is the option we will be using.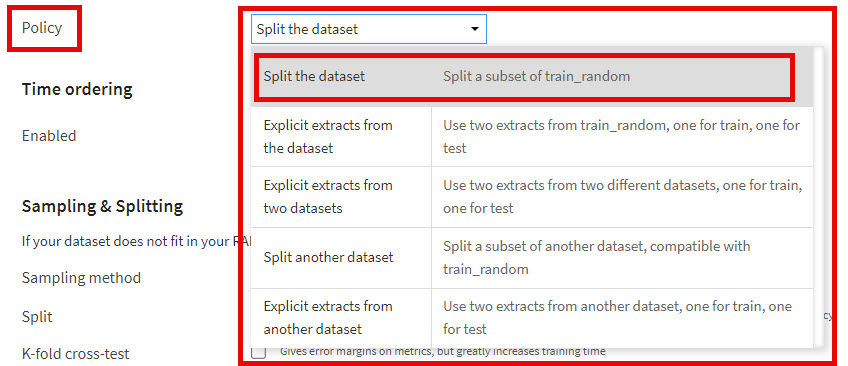
Under "Sampling & Splitting" there are multiple parameters to configure. Dataiku’s documentation covers basic descriptions and explanations of each. Here, we’ll delve into the less obvious, under-the-hood behavior.
Sampling Method
There are multiple options here and most of them are straightforward. We recommend using No sampling (whole data). Any choice here besides ‘No sampling (whole data)’ is actually reducing your Train + Validate dataset before you even split it. Ask yourself if you would be better served to do this before entering the Lab. The result would be the same and the outcome is data you can easily explore versus the somewhat hidden output datasets in the Lab post-sampling.
How much data is too much to include in model training? It’s not just the row count to consider but the number and types of features. This choice is up to the user and depends on how much time and resources they are willing to allocate to this process. In general, the more data, the better.
If you decide that your data is too large and you don’t want to use all of it in the process of ML model creation, as explained above it is recommended that you reduce it prior to entering the Lab. Your first step will be the same (Split data between Train + Validate and Test) except that your percentages won’t add up to 100%. Alternatively, you can use a Prepare recipe to reduce the features (columns) in the dataset prior to splitting. In this case, once you enter the Lab, you would still choose No sampling (whole data) for the sampling method.
.jpg?width=795&height=529&name=Dataiku%20Lab%20Split%20Sampling%20Method%20(2).jpg)
Train Ratio
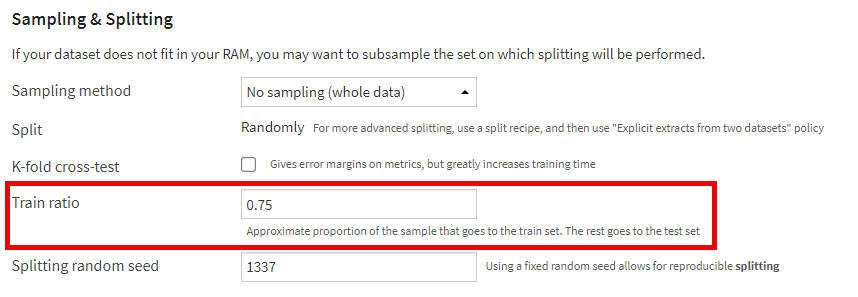
At the beginning, we explained the different methods of splitting data. When we have more than one model to evaluate, we either split three ways by percentage or we use k-fold cross-validation. The Train ratio is used for the percentage split method and here it represents the ratio that will be used for the Train set versus the Validate set. There are two important notes to consider here.
- Dataiku here refers to the Validate set as the Test set. This is not to be confused with our hold-out Test dataset that we split off from the original dataset outside of the Lab.
- This percentage is the ratio of the Train + Validate dataset to be used for Train, not the percentage of the original dataset. For example, let’s say of the original dataset, we wanted to use 60% for Train, 20% for Validation and 20% for Test. We already selected 80% for Train + Validate and 20% for Test prior to entering the Lab. Now we have 80% of our data in the lab and we have to tell Dataiku what percentage of the 80% should be used for Train. If we say 80%, that will end up giving us 64% for Train and 16% for Validate (Dataiku "Test"). To get closer to our desired split, we should decrease this to 75%. That would yield 60% for Train and 20% for Validate (Dataiku "Test".)
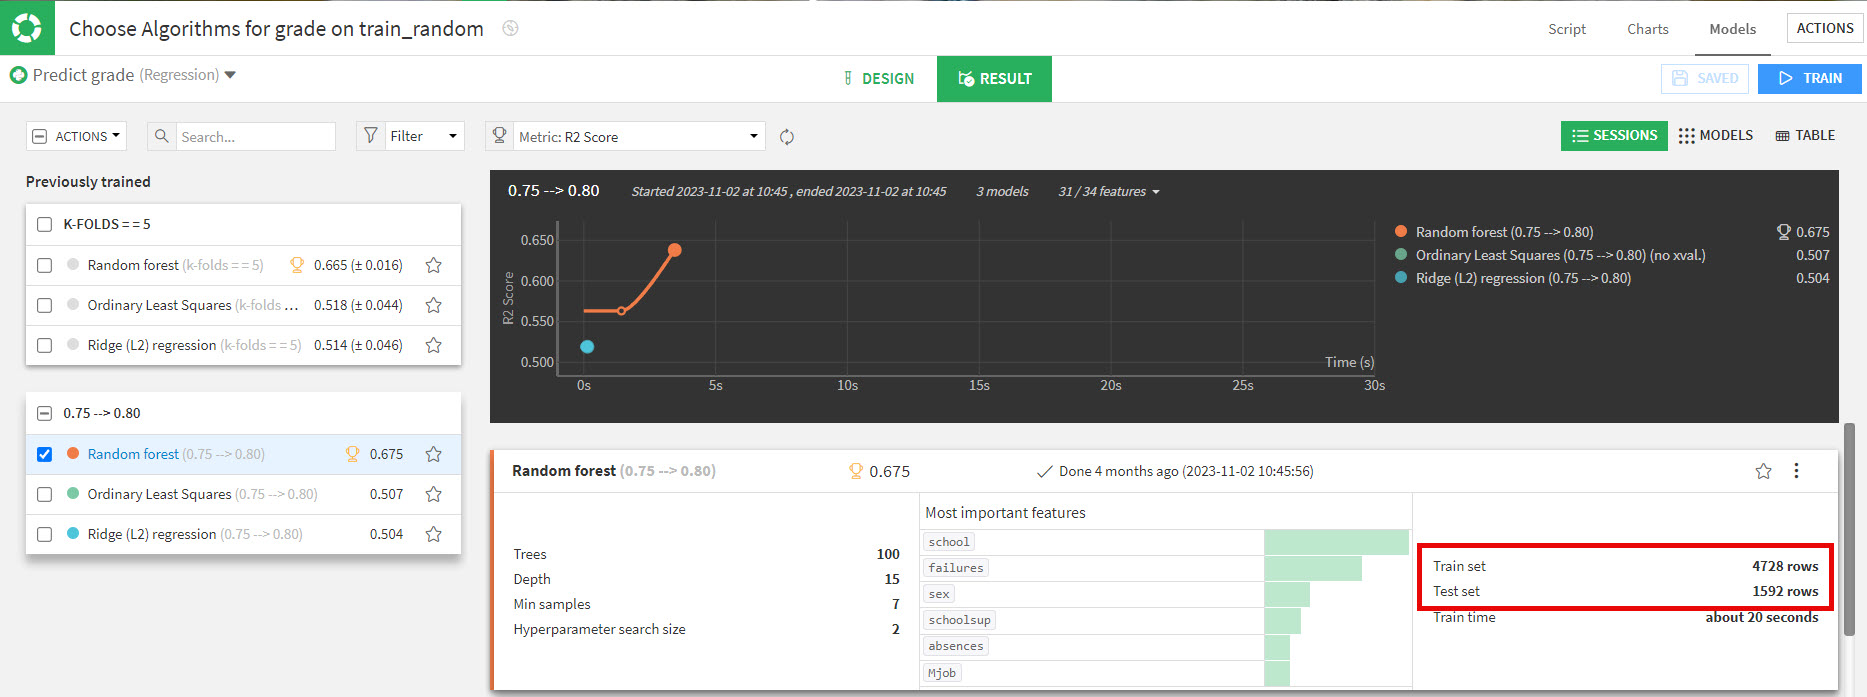
In this example, when we selected 0.75 for Train ratio, you can see the output number of rows for Train is 4,728 (roughly 80% of the original dataset’s 7,900 rows) and Validate (Dataiku "Test")
is 1,592, roughly 20% of the original set. Objective achieved!
 If you are choosing to split by percentage and not use k-fold cross-validation, this is the last parameter you need to set under "Sampling & Splitting". From here you can set your other parameters like features handling, algorithms, etc. and then train your models.
K-Fold Cross-Test
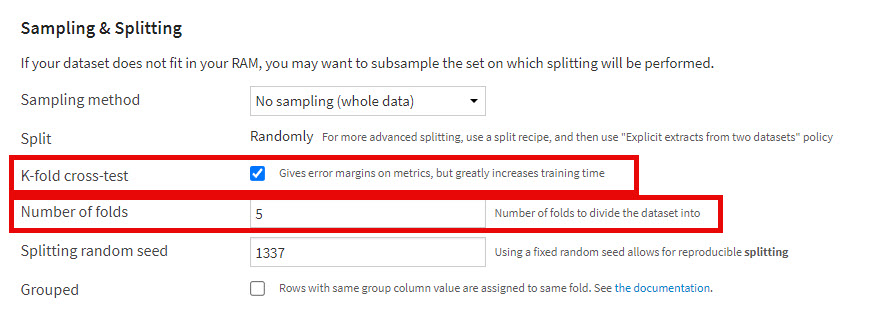
If you decide to use k-fold cross-validation for splitting the Train + Validate dataset, then you would check the k-fold cross-testbox. Once checked, you need to specify the number of folds. The default is 5. When training is performed, the Train + Validate set will be split into 5 folds and trained as described above. The last step of k-fold is to use the entire Train + Validate dataset to train the model and the average of all the iterations of training with folds to evaluate the models.
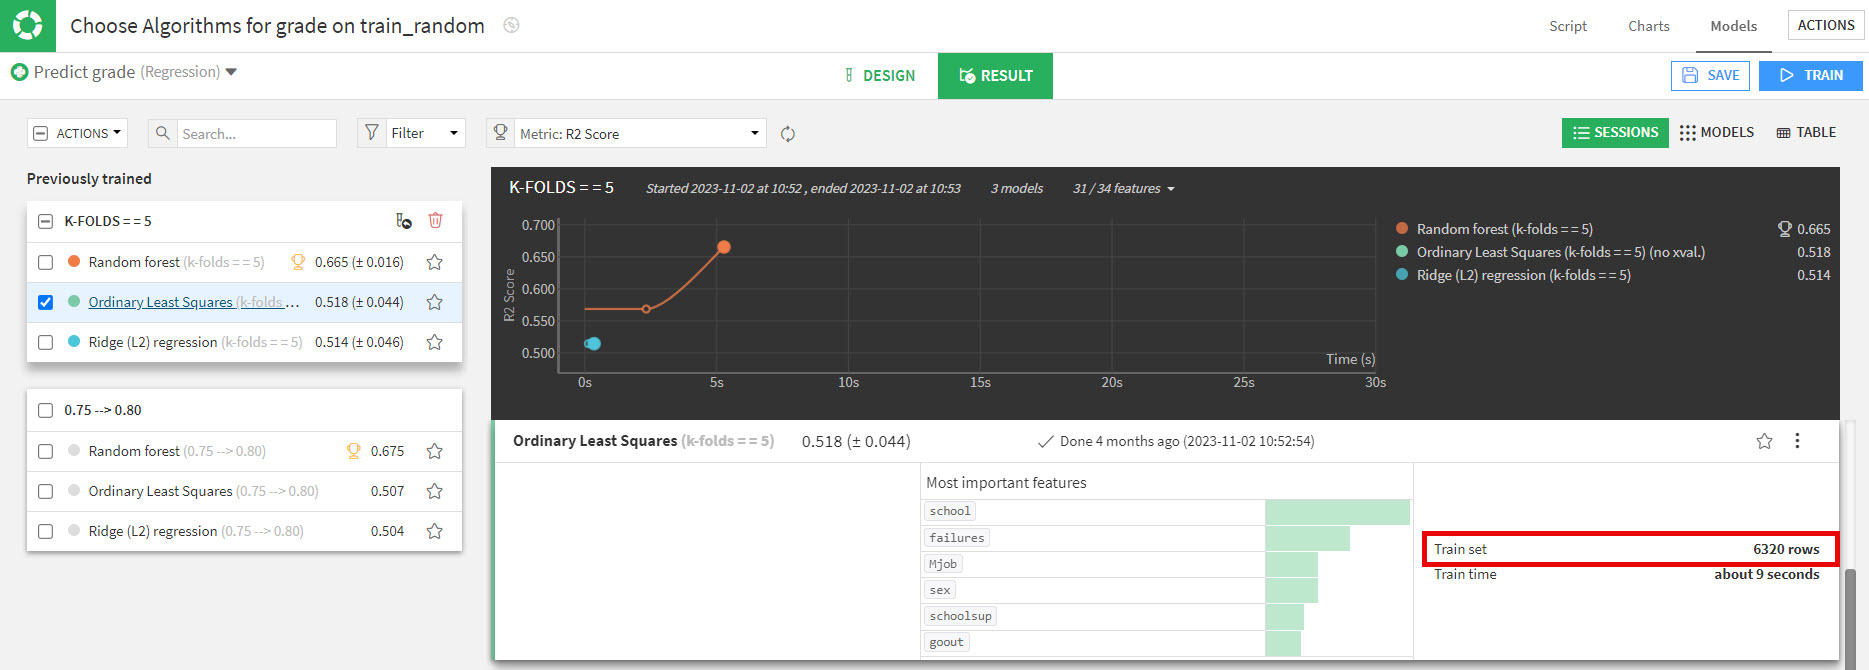
 If you look at the number of rows used by the model, you won’t see a split between the Train and Validate (Dataiku "Test") like we did with the percentage split method. This is because all the data was used for both processes as previously explained and it is simply labeled "Train set".
Accurate Reporting With Data Sampling
Data sampling is a key skill to master as a data scientist as it ensures that the performance metrics you report on and your models are as accurate and unbiased as possible. With this knowledge and the help of easy-to-use tools like Dataiku, you can be confident that your analyses are providing the best insights possible for your business.
Explore more ways to maximize the performance of your metrics through this blog on model testing in Dataiku.
| FEATURED AUTHOR: SHELLY KUNKLE, SENIOR DATA CONSULTANT
-1.png?width=290&name=Blank-Template-Facebook-Post%20(2)-1.png)


.jpg?width=300&name=Untitled-copy-1%20(3).jpg)
.png?width=695&height=396&name=Multiple%20Models-%20Percentage%20split%20(1).png)